Showing posts with label tutorial. Show all posts

Monday, 21 April 2014

Tilt and shift + lens buying tips

About a year and a half ago, I purchased a Canon TS-E 24mm f3.5 lens. A so called tilt and shift lens.

I bought it (second hand and in excellent condition) because I'd been shooting previously with a Sinar and a Rollei SL66 in the studio, which both have T&S capabilities and I wanted to be able to replicate the effect with my DSLR without resorting to computer trickery  .

  Sinar in the studio with the movements showing

Unfortunately my use of the lens was confined to testing it quickly in a car park when I met the guy who was selling it. We both lived far away from each other and agreed on a point midway where I could quickly test the lens before handing over the money.   

My method for testing a lens is this. 

  • I give the lens a visual inspection. I look for dust, dirt scratches etc on the lens. There were none.
  • Then I attached it to my camera and made a series of shots of the same subject in unchanging light using aperture priority. I shot at every aperture from f3.5 (wide open) to f22 (fully stopped down). I then scroll through the previews pictures on the screen. They should all be uniformly exposed. If one isn't then there is the chance that the aperture blades are not functioning properly. 
  • Next test is the shoot at different distances and check (with the help of the screen again) if the pics are sharp.
  • The last test is only done if the lens is an autofocus type (this particular lens is manual focus). I shoot a series of images of the seller walking towards me to try out the servo focussing. It also gives me a pic of the seller, should there be any "difficulties" later  :)
The lens passed all the tests and I gladly handed the money over. When i got home I put the lens in my equipment drawer and promised to use it on my next job . . 

Fast forward eighteen months later and I was wondering what to take pictures of on my free Sunday. I remembered the lens which was still sitting unused in my drawer. 

There's a beautiful mustard rape field about six minutes away from my house which is backed by part of the Jura mountain range. I decided to take a pic of this using the lens to get only the trees in focus.


I set the camera up on my trusty Benbo tripod and made sure that everything was level


This is NOT level

 The lens can also be rotated to use in vertical format 
 whilst still able to make use of all the movements.

After making a few test shots, I tilted the camera upwards and the lens downwards to give me the minimum amount of depth of field and I focussed using the live view mode to ensure that the trees were sharp. I ten took the picture (using self timer) at the minimum aperture.
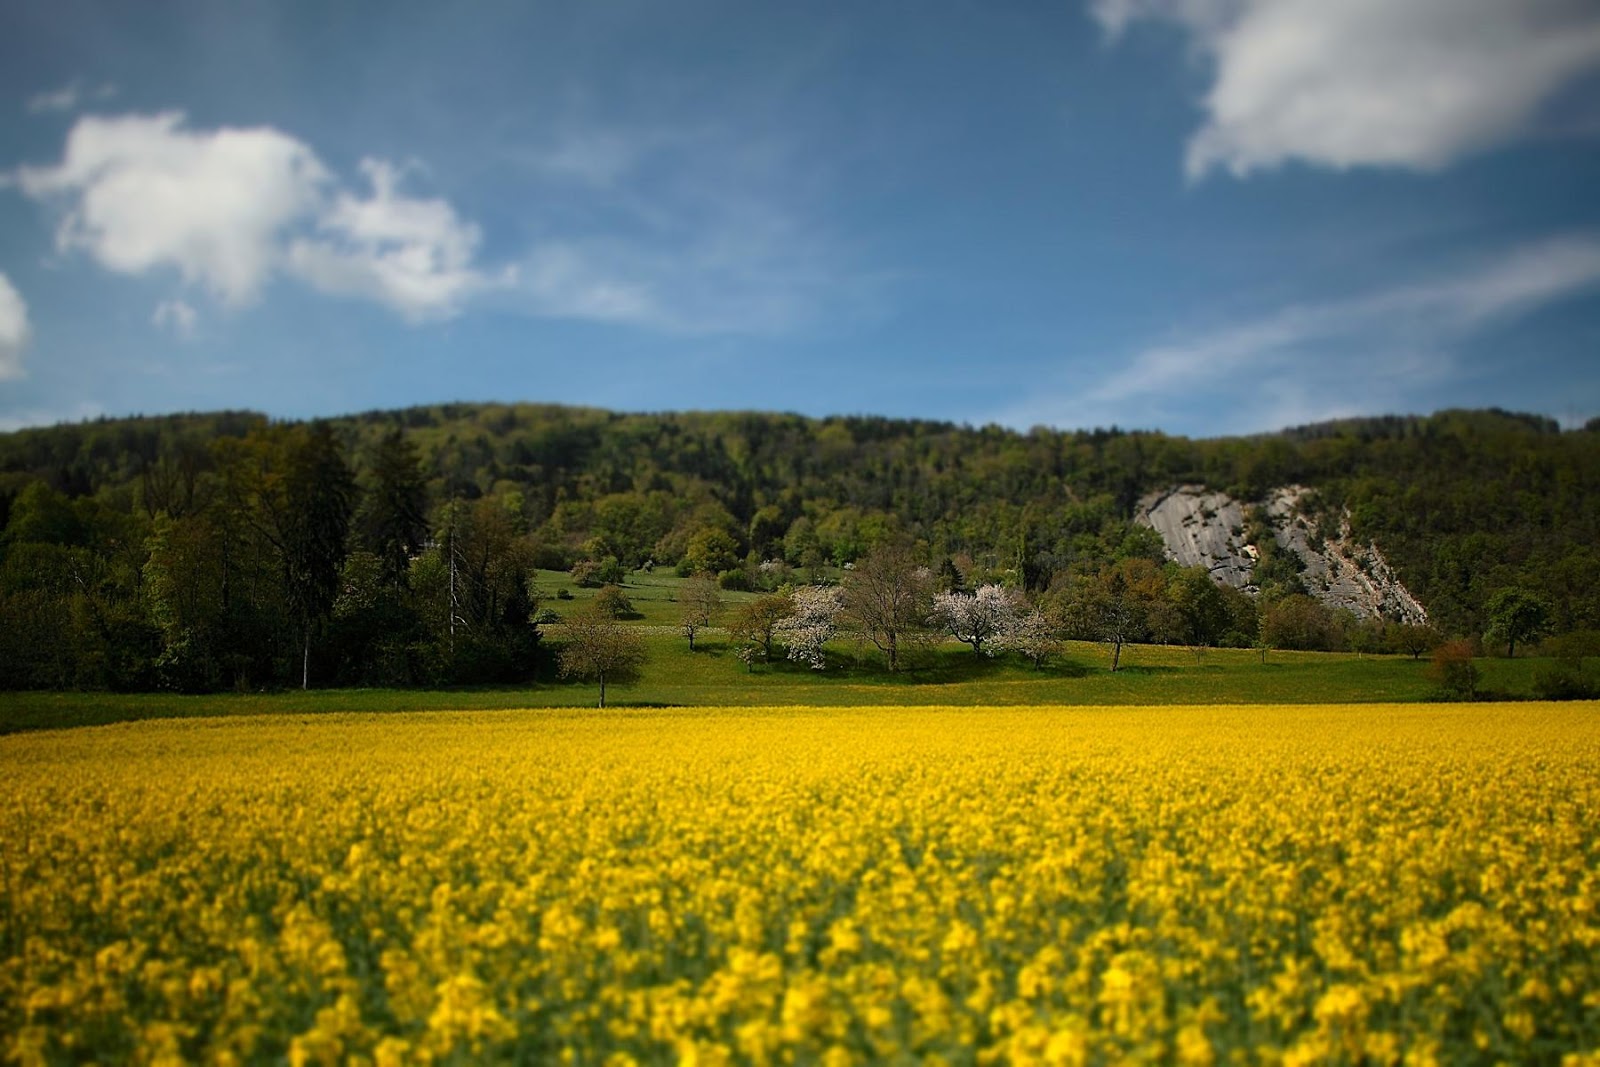
Mustard rape. 1/3200sec @ f3.5 ISO 200
This pic is best viewed at full screen

 
I processed the RAW file in DPP and can honestly say that I'm pleased with the result. Unfortunately, there were no profiles for this particular lens so I used on instead for the 24mm f1.8 model.

I love playing with this particular piece of kit as it makes me stop and think about what I'm tying to achieve. Focus is manual and very precise. The live screen mode is recommended to be able to see what is happening. A good tripod is a must.

One person approached me whilst I was taking these images and informed me that the latest version of the lens is much better. I answered that just because Canon had replaced it didn't mean that it had suddenly gotten worse overnight!

There's a wonderful article by Keith Cooper over on the Northlight Images website about what exactly you can achieve with a T&S lens 

I'll be using it next month for an interior shoot that I have planned.

Thanks for reading.

Wednesday, 14 August 2013

Three different ways of using an image.

I was at Zürich airport last weekend to say goodbye to a family member.

I neglected to take a camera with me as I thought it would be a quick goodbye at the airport and then back home. 

I was mistaken.

There is an observation deck open to the public which costs only Fr 5 and affords the visitor some splendid photo opportunities so we decided to take a look.

After seeing all the aircraft taking off from such a great vantage point, I decided to take a few snaps. 

First off I used the panorama function on my Samsung Galaxy S3 to take in a wide area of the apron.

This is the view I got with five images.


Press the play button and you can use your mouse to "move around" in the image.

I then went to the other end of the observation deck and watched the larger aircraft taking off.

It was a very sunny day and I could hardly see the screen on my phone even when it was shielded by my hand. I found myself having to use reference points to guess when the aeroplane would be visible. With that in mind, I decided to use the "burstmode" on the Galaxy to make sure that I would get the 'plane in view ( the so called spray and pray method so beloved of many sports photographers ). On the Samsung Galaxy this is activated simply by holding your finger on the release button. I was making around twenty images in a few seconds.

Burst sequence on the Galaxy S3

When I got home, I had the idea of making an animated Gif of this sequence.

A quick search online led me to this website which makes free gifs using images that you upload. I simply resized all the images I needed then uploaded them. In seconds I was presented with an animated gif of the Swiss aeroplane taking off.

Animated gif, courtesy of Gifmaker.me

One of the images I decided, would make a great desktop background, so I loaded it into Snapseed. After lightening the shadows a bit and increasing the saturation a touch, I was ready to use this image on my PC.

 My new PC background

I did take several other images that day but they will have to wait for another post.

I hope you enjoyed reading this.


Tuesday, 6 August 2013

There probably isn't an App for this. Yet!


If I'm feeling lazy and want to reproduce a tilt shift effect on an image with my mobile phone, I can use the Snapseed App. If I want a faux HDR effect, there's an App for that as well.

However, there's one effect that I haven't yet found an App for. Can you guess what it is? The answer is . . wait for it . . polarisation.

That's right. the humble (if somewhat expensive) polariser filter. 

I've always had polarisers in my equipment collection. They are a great accessory and if looked after correctly, will last as long as, if not longer than, your camera gear.

So, what does this marvellous piece of glass do?

To put it briefly, it removes reflections from non metallic surfaces and intensifies colours. But, there is a caveat. The effect will be most effective when used at right angles to the sun. This means that if you are using it to remove glare from a shop window, then don't stand full on to the window. 

The polariser has two rings. One has the filter thread and remains fixed on the lens while the other rotates. The effect of this rotation is visible when looking at a live image through the viewfinder. You notice the effect, whether it's reflections disappearing, blue skies getting more intense or colours intensifying as you turn the ring.

Here are a few examples that I took a couple of weeks back. This was a spur of the moment thing so I didn't have a tripod with me to produce exactly the same field of view in each image. I had to first take the picture, then screw the filter on and rotate it for the best effect and then take the next picture.

I saw this interesting shop window in the town of Wangen an der Aare. It was a very sunny day (ideal for polarisers) but there were lots of reflections. Standing at a right angle to the window I rotated the front filter ring whilst observing it through the viewfinder. When I saw that it had removed most of the glare, I took a picture.


 Before and after

One thing to note, when using the polariser is that it cuts down on the light reaching the film / sensor. to counter this, you can either increase the ISO or use a tripod if you think that the exposure will be too slow.

Then it was down to the river where I wanted to demonstrate the water reflection killing capabilities of the polariser.


Again, a before and after shot showing how the slightly washed out sky plus the grass colours in the first shot have been strengthened in the second one along with lots of the water reflections being eliminated.


 As if more proof were needed. Here is my favourite example shot from that day. Just look at how much more intense and clear the water is in the second photo when compared with the un-polarised first picture

Another word of warning. As I mentioned earlier, the filter consists of two rings. If you are using one on a very wide lens, you may experience vignetting where the filter is visible in the corners of the image (i.e.dark corners). To combat this, take off any other filters already on the lens or buy one of the newer generation of slim filters.

Thanks for reading. Please feel free to leave any comments or even ask a question or two!

Wednesday, 3 July 2013

Backing up

On location backups

A colleague of mine recently requested my advice about buying a camera. As he became more and more engrossed in this wonderful hobby he enquired about how to best back up his images. I explained my method and told him to copy or adapt it to his way of working.

Here's what I do:
  1. Shoot pictures
  2. Copy the images to my laptop (leave the images on the card for now)
  3. Copy* these images from the laptop to external hard drive number 1.
  4. Copy* these onto External hard drive number 2.
  5. Work on the laptop on any images that need a touch of Photoshop
  6. Repeat steps 3 & 4
  7. Once I am sure that hard drives 1 & 2 match, I format the cards in the cameras they are to be used in. Depending on the content, I sometimes completely wipe the cards*, leaving no trace of what was on there before. I then remove them from my laptop.
  8. I give hard drive number 2 to a colleague who stores it for me. I do this because in the event of fire or whatever, I will have one copy at least of my images. (Needless to say, my hard drive is password protected.

 Nine terrabytes of space
 

To completely wipe my cards or hard drive clean, I use the excellent "Shredder" freeware programme by B. Nikhil Baliga. It's available from this website.

* For the copying, I use the free SyncToy from Microsoft. It has the option to copy only the files that have changed since your last backup. You can download it for free here.

Any backup system is better than no back up system .

What method do you use?

Thanks for reading.

Monday, 27 May 2013

On location portrait photoshoot

I received an email from the pharmaceutical company Nobel Biocare asking if I would be free to take some portraits of a dentist for an article that they will soon be publishing.

When I  responded positively that I was available, I was sent details of the shoot and the requirements of the image that was needed. Basically it was a vertical format, preferably three quarters or head and shoulder with a slightly out of focus background. Another proviso was that the dentist shouldn't be wearing his work clothes. 

All very straight forward except it was to be taken in his surgery during business hours. There would be patients in the vicinity. I decided to travel light and although all my gear remained in my car, I used only my 5d MKII with my new 24 - 105 zoom, a Speedlite 430 EX2 and an interesting diffuser that I picked up on a Swiss auction site for a few Francs. I love this device as it gives a lovely almost shadow free light.

The new diffuser in place

I arrived half an hour early at the practice and looked around whilst Dr Sleiter tended to business. As the background had to be slightly soft, I looked for a location that had something on the walls that wouldn't detract too much. I saw two rooms that I thought would be suitable for the image. In one room, the ambient light was measured at 1/80sec at f5.6 and the other recorded 1/200 sec at f5. These apertures were chosen to render the background as slightly out of focus.

When Dr Sleiter was free, he changed out of his dentist clothes and selected a shirt which (in my opinion) wouldn't clash with the surroundings or background.

We started in the first  room and I selected 1/80sec at f5.6 manually on the camera. The walls weren't white and this was seen in the image as the flash reflected from them. The resulting image is warm, which I quite like.


 1/80sec @ f5.6 with flash

My only concern was the background. I wasn't sure if it would distract too much on the magazine page where it was appearing.

After a couple of more pictures we moved to one of the surgeries where it was a lot brighter. I started (with the settings established earlier) with a head and shoulders of Dr Sleiter standing then I had an idea. What about making the foreground out of focus?  


1/200 @ f5 with flash

 To be safe, I first asked him to sit on one of the dental chairs and I took a head and shoulders pic of him.


 1/200 @ f5 with flash

Then I swung the dental equipment in front of him to give some sort of "meaning" to the image. This is my favourite of the bunch as it immediately says to me "dentist in his environment".

All in all an enjoyable assignment that went very smoothly with the minimum of equipment and setting up.

It will be interesting to see which image they use in the magazine.

Thanks for reading.


Monday, 18 March 2013

Simple fill-in flash techniques


Flash. You either hate it or love it. Some people steadfastly refuse to use it, thinking that it will bleach everything in the picture out. Today's modern cameras can be set to record an images in seemingly very dark situations and still give good quality that would have been unthinkable a few years back. 

However, used correctly, fill in flash can greatly enhance a photo. I have prepared some notes on how to use fill in flash correctly using a wide variety of camera and flash types.


Image A                                             Image B

The two pictures above show how I used fill in flash on a Vivitar 283 flash to lighten the shadows whilst photographing Marianne. The 283 is a semi automatic flash meaning that the user has to first set the correct aperture on the camera and the flash manually. I knew that the correct exposure for the overall outdoor scene was 1/200 sec at f11. I simply set these manually on the camera and used the 283 flash at f8. This meant that the flash gave out light which was one f-stop less than the ambient light. I did it this way because I didn't want the subject to be over lit. In the second example, Marianne's face is well exposed and not too bright. The flash has also added a pleasing catch-light to her eyes.


Fill in flash with a dedicated unit.


Image 1

  Image 2

Image 3

Image 1
Take a look at these three examples. In the first one, I exposed for my wife Oksana's face. This was taken at 1/125 sec @ f8. The background (gardens at Gruyère castle) is horribly overexposed. This is an occasion when I wanted the background to be illuminated to the same amount as the foreground.


Image 2
I took another image with the camera set to 1/200sec @ f18. This corresponded to the outside conditions. However, this time we have the opposite effect with Oksana's face nearly hidden.


Image 3
The solution, using a Canon 420 EZII Speedlite is wonderfully simple. Keeping the camera set for the last image i.e. 1/200sec @ f18 (for the outside ambient light), switch the flash on and fire away.

Feel free to leave some comments and thanks for reading


Wednesday, 14 November 2012

DIY telephoto


Supertelephoto on your smart-phone

I was recently thinking about upgrading some of my lenses. This made me think about what I photograph the most. 

Looking through the images that I've been making for the last year or two led me to one conclusion: I don't really need anything long. My most used lens seems to be the excellent 17 - 40 F4L zoom from Canon. After that, it's the 28 - 135 IS zoom which rarely gets used beyond about 70mm.

My last lens acquisition was the Canon EF 50mm f1.4. I absolutely love this piece of glass. It's small, fast and very sharp. It's now my de facto "carry around" lens. Ideal for everything from portraits* to copy work.

In my cupboard I have a 300 mm f4L and the 70 - 200mm f4L. I cannot remember the last time I used the 300mm. The 70 - 200 last came into service at the Streetparade in Zürich in 2011*

Also on my "least used" list is my 24mm f2.8 and my Russian Zenitar 16mm Fisheye which last saw service in 2010*.

I think that the reason I don't use these last two lenses is that A: I only rarely need a fisheye effect and B: The 24 mm focal length is covered by my 17 - 40.

There have been the (very) rare occasions when I've been out and wanted to photograph something in the distance. When this situation occurs I normally have either my Canon G9 or my Samsung Galaxy phone nearby. The Canon is OK as long as I don't use the digital zoom (which I've permanently disabled)

So what can you do if you are out and about with only a pair of binoculars and your (camera enabled) smart-phone and you need to take a telephoto image?

I was looking at the accessories on sale for mobile phones last week and noticed a telephoto attachment available. I wondered what would happen if I tried to shoot through binoculars?

I dug out of my closet, an old pair of 10 x 25 binoculars and made my way to the kitchen. The view from said kitchen is ideal for testing lenses as there is lots to point your optics at.

Using just the standard setting on my Samsung Galaxy III I pointed it at a farmhouse where I knew that there was a Ronald MacDonald statue.


Hardly visible on this shot 
but the  clown is more or less 
in the centre of the image

Then I used the digital zoom to take another picture.


He's just coming into view 

I then reverted back to standard mode for the lens and held the lens against the eye piece of the binoculars and got this shot.


As you can see there is a lot of vignetting but this was due solely to the fact that it's damn near impossible to hold a camera together with a pair of heavy binoculars and press the shutter at the same time. I'd recommend a tripod or some sort of stabilising device.

The handymen amongst you may be able to come up with some sort of bracket that aligns perfectly.

Here's another example of the binocular effect that I took in Basel.


Normal field of view

Shot through binoculars

Of course if money is no object and you really need a telephoto, I can recommend this little beauty.


Canon 800mm f5.6 Fr 17.600

Not expensive / powerful enough? Well how about this? It is a 5200mm f14 lens in Canon fit. It has a lenscap the size of a dustbin lid and was sold on Ebay for $55000. It weighs in at 220lbs (99kg)


You can read more about it here

* As seen here

Thanks for reading

Sunday, 18 March 2012

Converging verticals

I'm quite happy with my old version 6.0 of Photoshop. It does all the things I need (normally sharpening and a bit of dust removal) and probably lots of stuff that I don't. I bought it second hand (with license key) on a Swiss auction site a few years ago.

One thing that It doesn't do very well (in my humble opinion), although I'm sure you'll correct me, is to correct verticals. When I shoot buildings I really have to have all the verticals to be true. This is where PTLens comes in.

This super programme acts either as a plugin for Photoshop or as a stand alone application and will (amongst other things*), let you correct verticals, horizontals and even rotate your image. The programme identifies the camera and lens used and corrects any aberrations particular to that setup. This lens / body database is continuously updated to include the latest models.

This is what the screen looks like with an image loaded before correction.


You can see that PTLens has correctly identifies the camera / lens combination. I have "barrel / pincushion" selected to correct any lens defects. I also chose a blue grid to show me how much I needed to correct.

Screenshot two shows the screen after I entered the corrections I needed.


You can see that I have used the slider for verticals and scaled the image by 117% because correcting for tilt, gave me some black edges.

I love this programme and always recommend it. You can read more about it and see more examples by visiting Tom Niemann's website here.

In case you're interested, I would normally have stood further back to get this type of image but on that Sunday, There was a tree to my back and I only had my EF 24 f2.8 lens with me.

The picture and it's location can be seen on Google Earth by visiting here.

Thanks for reading.

* the other things include barrel distortion, chromatic aberration and fish-eye "correction".

Monday, 2 January 2012

Emergency rescue

If you've stumbled upon this post whilst looking for the old TV series "Thunderbirds", then please go here:   :o)

If however you have (or are) wondering how to retrieve images from a memory card, then here is what I do. Please note that this is not an in-depth technical article. It is simply what I would do (and have done in the past) when I wanted to retrieve images from a damaged card.

First and most importantly, DO NOT shoot any more pictures on the card. If you do then you may lose some of the data that you are trying to rescue because the camera may overwrite them.

Second  Check to see if your card came with recovery software. Some of the high end card manufacturers such as Lexar, SanDisk and Kingston offer their own data recovery software.

If you don't have one of the cards mentioned or have deleted the recovery software, you will find that there are plenty of free programmes floating around the web to recover deleted data from storage devices. I use PCInspector. With PCInspector, you can specify which type of files you want the programme to search for. They also have a recovery service for physically damaged memory devices whether they're sticks, card or drives.

Another programme that I'm hearing good things about is Recuva. With this programme, you can check out thumbnails of recoverable images before recovering them.

One thing to remember is that any recovery software will scan the ENTIRE card for deleted data. This means that images which were made months, even years ago can be found and the process will take a long time. Especially with a large capacity card.

An 8Gb card can take 
several hours to scan


To remedy this, one thing that I do is to format AND wipe my cards before a job.

Using Fileshredder, you can wipe the free space on almost all types of storage devices and this means that when you do a rescue job, the programme only finds those most recent files.

Well that's what I would do in the event of data loss. You may have a better method or know of other software. I'd welcome your suggestions and comments.

All the best for 2012.


Thursday, 3 November 2011

How did I do that? Part 2

Banishing reflections

I work a great deal with reflective surfaces in my job. It could be a highly reflective silver grid on a light or even just the inside surface of a light reflector. Either way, these surfaces produce reflections which detract from the image.

Add to the fact that these surfaces are sometimes concave or convex then the problem gets worse as the curved surface takes in the whole room!

For small surfaces it's relatively simple to place the object in a white light tent. For larger objects it can get problematic and the images may have to be extensively retouched.

I had this problem recently when I was photographing one of a new range of LED lights produced by the company for which I work.

I had done all the catalogue standard shots and wanted to finish with a shot showing the light source itself.

When I looked into the reflector through my viewfinder, I could see myself! The light was just a bit too big to place in a light tent so I came up with another solution.

Here's what I did:


Camera is mounted on the FOBA stand. There's also a spirit level in the hot-shoe.

First result: 

That's me reflected in the silver reflector.

A large piece of white card with a lens sized hole in the middle is called for:


I used the self timer function on the camera to give me ten seconds of time to position the board correctly
 

This was the final result.


I make no apologies if you already know of this technique, but I simply like to share my knowledge.

Thanks for reading

Tuesday, 27 September 2011

How did I do that? (Part 1 of many to come)

In an effort to bring more visitors to my blog, I will from time to time dispense hints and tips that I use in my photography in a "behind the scenes" manner.

This time I'm showing how I made this HDR.

As you may have read earlier, I took a holiday this year in the Italian region of Switzerland. From time to time I came across really beautiful, photogenic places of worship. When I see really old churches with frescoes, I know that I have to record them using HDR. This was no exception.

It was a really warm day and to get to the church, I had to climb LOTS of steps. For this reason and because of the winding alleys and streets, I decided against taking a tripod with me. I did however, take a mini G-Clamp table top tripod. This little beast which I bought many years ago can be clamped to a ledge, table or shelf or if there are none available, can be stood of a surface thanks to two small support legs. On this occasion, I lay on the floor (to get the perspective I wanted) and mounted the camera using the G-Clamp in its "tripod" mode.

 Discussing perspective with Nikita

The clamp itself is a bit flimsy so I used the camera in self-timer mode in order not to shake it too much. Ten seconds later, I had three shots of varying brightness which I fed to my HDR programme, the results of which you can see here.

The finished result after treatment from Photomatix


The image can now be seen in Google earth or on Panoramio at full size here.

To my left was an alcove which I also found interesting. For this image, I clamped the G-Clamp to a pew.

HDR has captured the highlights and shadows

The church is "Sta. Maria del Sasso"located in Morcote, Switzerland.

Thanks for reading. If you have any questions, please don't hesitate to ask.


Tuesday, 23 August 2011

Make use of what's available

Last week I was making close-up images of various lighting products. It was a baking hot day and I carried all my gear over to the building where the lights are located. After getting everything ready I discovered that I'd left my Benbo tripod back in my studio.

I couldn't be bothered to go all the way back to fetch it so I scouted around and found a stepladder which did the job (together with a couple of books) perfectly.
 The setup

The image will now be used over a double page spread in a brochure.

The result
Thanks for reading.


Wednesday, 1 December 2010

My reputation was saved by a ZSD.

Last week I was looking through some of my old press stuff from the days in the early eighties when I freelanced in London for some twelve different publications.

Looking at the images bought back many memories of various jobs and situations etc, which I'm quite happy to share here (even the embarrassing ones).

One job in particular sprang to mind. I was asked to provide pictures in  colour for Hello magazine and black and white for the City of London Recorder newspaper.

The job itself was to photograph the Queen visiting the New Royal Mint premises.

On the day of the visit, I arrived in plenty of time and secured myself a good vantage point. The photo pass that I was issued only allowed me to photograph the Queen outside.  The indoor shots would be taken by another photographer

I was using my Canon A1 and the T90.The A1 was loaded with Ilford HP5 black and white film rated at 400 and the T90 was filled with Ektachrome 400 slide film. My reasons for the film in each camera was that I wanted to use the spot metering capability in the T90 to make sure that I was exposing correctly for the skin tones. Essential with unforgiving slide film.  The black and white, I would develop myself later as the newspaper was only printed once a week.

I opened the back of the A1 and threaded the film tongue into the take up spool, wound one frame on and then closed the back. I then fired off a couple  more frames until the mechanical counter showed number one in the small window.  Then I opened the back of the T90 and laid the tongue of the Ektachrome film against the take up spool. I closed the door and heard the film being automatically loaded. Thus set, I waited for The Queen to arrive.

HM always attracts a good crowd and I shot lots of pics of her with her subjects alternating between the two cameras. My window of opportunity was however all too brief and before a few minutes had passed, the Queen had gone inside.

I looked at the film counters on both cameras. The A1 had made 27 images and the T90 was nearly full with 34 frames gone. I put both cameras back in my bag and drove to Joe's Basement in Wardour Street SOHO to have the slide film developed. Joe's was a photolab that was open 24 hours a day. You could go in at one o'clock in the morning, hand in your slide film and have it back two hours later. They also did push processing, printing, mounting and lots of other photography related things.

I gave my film over the counter at 11:00 o'clock and was told that it would be ready by one. This was ideal because I had an appointment to hand in the best slides to the magazine at two thirty.

This meant I could go home, get some lunch, come back and pick up the slides then take them to the magazine with plenty of time to spare.

When I got home, I took the A1 from my bag and went to rewind the film. I pushed in the tiny film release button and lifted the lever on the film spool to begin the process.

Normally, for a thirty six exposure film, I would have to turn the handle about thirty or so times until it went slack, indicating that the film was back safely inside the cannister. This time however I felt the tension loosen after about two turns!

Shock!

Horror!

This could only mean one thing. The film had not gone through the camera. I had no black and white images for the newspaper. I felt sick. In the photography world, you are only as good as your last job. I had made a stupid amateur mistake and would be a laughing stock. No-one would employ a freelancer who didn't check if his film was loaded. What could I do? I began to formulate excuses but each one sounded more absurd that the previous one.

Then I had an epiphany. A simple solution came to me. I remembered that a couple of months  previously, I had bought myself an Ohnar Zoom Slide duplicator (ZSD) from Jessops photoshop on Tottenham Court road. This was a tube, containing a fixed focus lens at f22 that fitted on the front of an SLR and enabled the user to insert a slide at the front end in order to take a picture of the resuting image. There were two types. A fixed focal length and a zoom version. I had paid about £25 for the zoom version.

 Zoom slide duplicator. Image by Delgibo on Flickr


It was now nearly time for me to pick up the slides from Joe's. I grabbed my T90 , the ZSD and a roll of HP5 then made my way to Wardour Street. The slides were in my possession at one fifteen.

At about one thirty,  I made my way to one of the sit down cubicles in the mens toilet at Hello magazine. The next half an hour or so, saw me sitting on the toilet with my camera, ZSD attached,  pointed at a light bulb. I fed the best slides into the ZSD, zoomed in to crop and pressed the shutter, thus making a black and white copy of each colour image.

At two twenty five, I was able to hand over the colour images to the picture editor at Hello magazine.

That evening, I processed and printed the black and white images and handed the pics to my editor.


 Colour image from T90
Black and white copy from ZSD

 Ektachrome original

HP5 copy from ZSD


Reputation intact. Until next time that is!   ;o)