Showing posts with label photography. Show all posts

Friday, 8 January 2021

Sometimes the best camera . . .

There's a saying that "the best camera is the one that you have with you". This simply means that to capture an image, you don't necessarily have to use your state of the art DSLR, compact or bridge camera. Whatever you have to hand at that moment will suffice.

This was brought home to me recently when I decided on a whim, to take a few pictures at the nearby Teufelsschlucht (Devil's Gorge).

My aim was to capture a few shots of the waterfall using various shutter speeds to use as source material for some of my photography classes.

I parked nearby and, because of the slippery track down to the gorge, I decided to travel with the bare minimum of gear. Namely my new Fujifilm X-H1, a Fujinon 10-24 wide-angle lens and my trusty Benbo tripod.

Setting off down the track, I was pleased not to be carrying a selection of lenses and bodies with me but when I got to the waterfall I discovered a problem. The waterfall had all but dried up! Hmmm.

I tried a few experimental shots of the trickle of water running down the rock face but it was hardly inspiring. I decided to go back to the car and as I,turned around to make my way out of the gorge, something in my peripheral vision alerted me to the fact that something seemed "out of place". It was a frog. Clinging to the moss which covered the rock face. He (or she?) was poised motionless. Probably waiting for me to leave.

I decided to make the best of an otherwise lost chance. I wanted to take some closeups of the reptile but only had my superwide zoom lens with me: the Fujinon 10-24 f4. This is roughly the equivalent of my Canon 16-35 lens which I use for interiors. I would have preferred to have a macro lens but that was in the car and I really didn't want to trek all the way back to fetch one.

The wonderful Fujinon 10-24 f4 zoom

I re-positioned my Benbo tripod as slowly and as carefully as I could because I didn't want to frighten him off. Using the lens at the 10mm focal length meant that I would have had to get uncomfortably close which I wasn't keen on doing in case it frightened the frog. It would also have made more of the background seem in focus (one of the traits of a wide angle lens) and my aim was to try and isolate the frog and the background as much as I could. 

I chose instead to  shoot at the 24mm end (roughly equivalent to a 38mm lens on full format) and choose a wide aperture to try and render the background as unsharp as possible while still being recognisable as a gorge.


Here is the camera in position. You can see the last remnants of the waterfall in the background.

The Benbo is an extremely versatile tripod and able to get into the most awkward positions.

I am still relatively new to the Fuji system and it took a little bit of messing around to get the exact settings I wanted, but one thing for which I was grateful was the tilting screen. Normally, with the Canon, I'd have to contort myself into being able to see through the viewfinder. With the X-H1 I simply tilted the screen!

Tilting monitor

After a bit of positioning and repositioning, I selected aperture priority mode using f4. With 200 ISO this gave me a shutter speed of 1/4 sec. Such a slow speed wasn't a problem because the frog was obligingly still!

Several pics in both vertical and horizontal mode and this pic (above) was my favourite.

So. As I wrote at the beginning, the best camera for capturing something is the one that you have with you at the time. If I had only had my mobile phone with me, I would have used that. A super wide zoom is not the ideal lens for close-up nature photographs but it was all that I had with me.

Thanks for reading. Have you taken pics with gear that isn't normally used or recommended for a particular subject? Leave a comment and tell me about it. 

Tom

Wednesday, 30 March 2016

A shoot shooting shooting stuff!

An interesting opportunity recently presented itself.


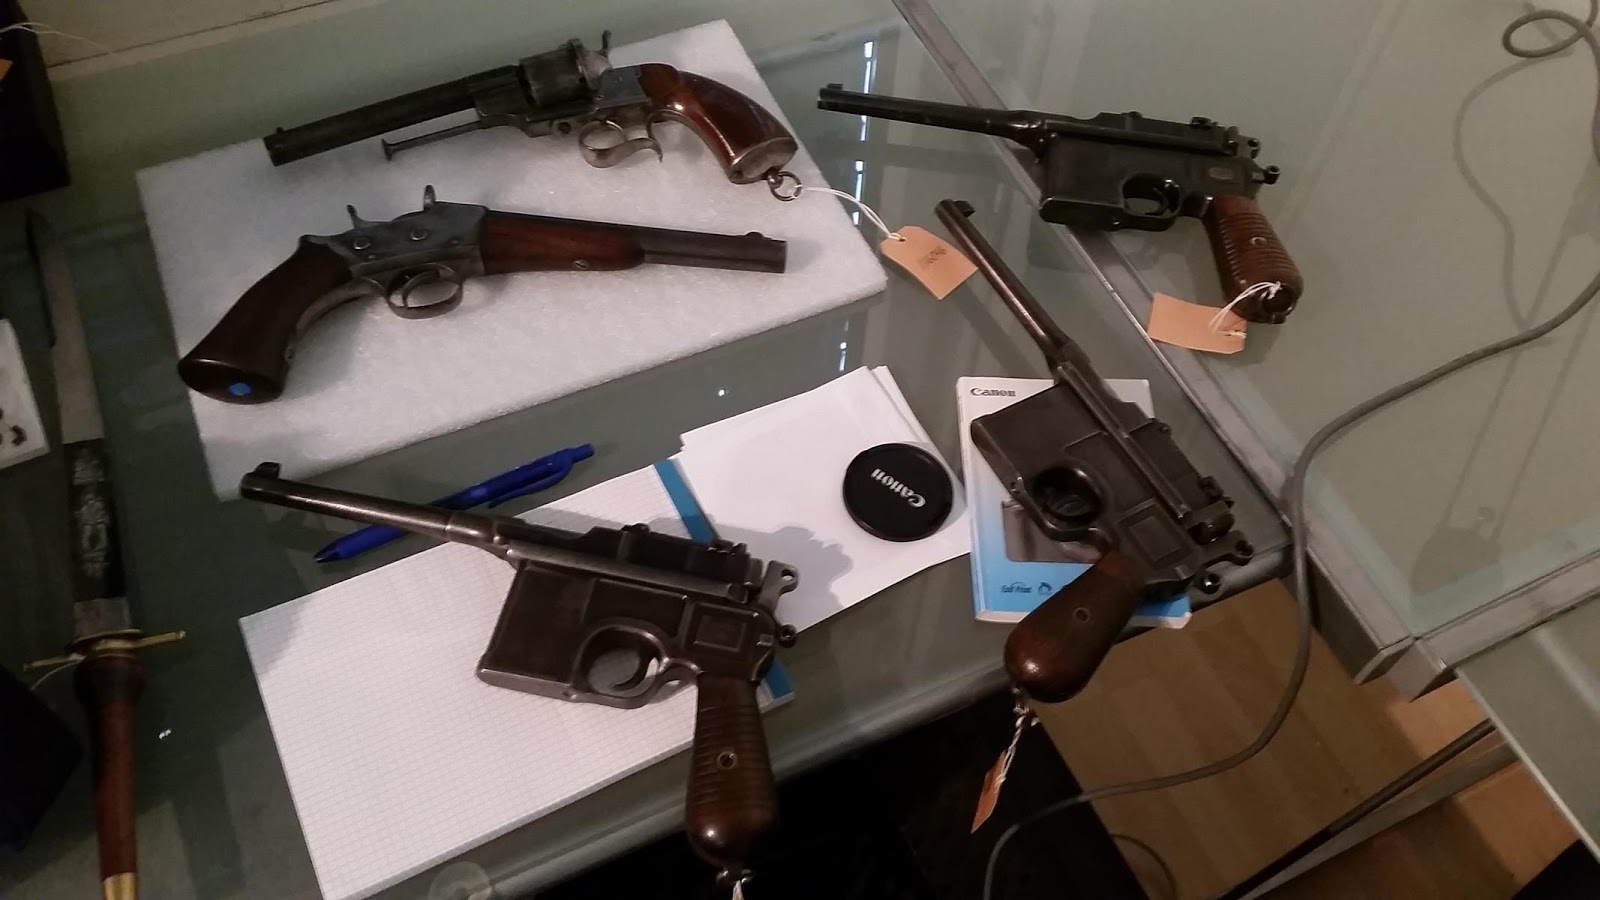
A friend of mine who has a gun dealership asked my advice on taking product shots for a catalogue to be used at one of his upcoming auctions.

   Some of the 600 or so weapons to be photographed and auctioned.

He had photographed previous auctions using a small point and shoot compact but was dismayed at the inconsistency of the results.

I discovered that he had an old Canon EOS 400d and we decided to use that for the shoot together with its 18-55 f3.5 - 5.6II kit lens. however, he was so enamoured of my demonstration of the EOS Utility programme (which comes with all canon raw capable cameras) where the camera can be tethered to a computer, that he went out and bought an EOS 70d.

My plan when doing product photography is always as follows:

1:     If the products are on a wall or lying flat on a table, make sure that the camera is perpendicular to the subject. I use a simple spirit level on the subject and on the camera. At first I was using a small spirit level on the back of the 70d until I read the instruction manual during a coffee break that it had a built in electronic level! 

Before discovering the electronic level!

2:     Make sure that the basic lighting is consistent if you are looking for even illumination. That means take a light meter reading from different parts of the area to be photographed to make sure that there are no darker or lighter areas that your eyes might not register. For this shoot, my friend was using constant lighting so we could gauge visually where any inconsistencies might be.

3:     When you have determined the correct exposure, use that for the whole shoot as long as the light is consistent.

Quick, simple and effective

4:     Close the windows and draw the curtains (or blinds). If daylight is streaming into the room, it will show on the images as it gets progressively stronger and weaker throughout the day. the only light hitting your subject should be the stuff that YOU are supplying.

5:     Use a "standard" lens. This is a lens that equates roughly to the same angle of view that your eyes see (46 degrees). With a full frame camera this is the so called nifty fifty.With a Canon APS sensor camera it would be a 30mm. I use this so that no distortion is introduced into the image.

6:     Start with the biggest items first. As the items get smaller, you move the camera nearer. You DON'T zoom in!. If the lighting is consistent, you won't have to change anything except the focus as you are moving nearer.

Once you have observed and used the above methods, you will find that it goes really fast. in our case, my friend had one person taking out the weapons, another laying them down, another taking a picture using the infra-red release (to keep camera shake to a minimum.) and a fourth person cataloguing everything as it was shot.

 Workflow

Don't forget to take a few safety precautions. As our camera was balanced precariously at the end of a tripod extension arm, we used a carrier bag of ammunition to counter it!


 Who needs expensive ballast bags?


Tripping over cables should 
also be avoided.


 Guns everywhere

 Here are a few "behind the scenes" images taken during the shoot.


Thanks to an organised and motivated team, we were able to churn our way through nearly 600 rifles, pistols, machine guns, grenades, muskets, flintlocks, rocket launchers (yes really) and assorted paraphernalia in two and a half days.

Here are a couple of the first results.


The auction which will be available internationally will be held here in Switzerland at the end of April. You can get a catalogue and find out more by visiting the Swiss Tactical Center website.

I hope you enjoyed reading this. If you have any comments, please leave them in the box below.

Tom


Sunday, 28 December 2014

Website design

This year I was the official photographer for the Country d'Yv music festival held in Yvonand, Switzerland.


Various images of me at work by Ron Williams

An offshoot of that job was that the organisers asked me to also completely revamp their website. I already had enough images so it was simply a matter of creating something visually appealing and making use of audio and video as well.

The new Bluebird music band website can be found here.

I'd love your feedback. Have a great 2015 and thanks as always for visiting.


Tuesday, 25 February 2014

Photography tutorials, classes and walks

The interest in photography classes has been great. Lots of folks it seems now have great quality cameras but are dissatisfied with the results they are getting.


I've now given two portrait classes and a three part series on beginners photography. There has been good feedback for the course members as well who liked my laid back approach to teaching (i.e less on the theory and more showing and explaining).


 I mixed classroom basic theory with practical "in the field" shooting.


On the last day, we spent two hours out and about before coming back to the classroom and discussing the results

There will hopefully be more classes, walks and groups in the near future but if you would like to learn more about a specific area of photography then please don't hesitate to contact me.

Thanks for reading.

Thursday, 14 November 2013

Photo workshops

As alluded to in my last post, I will be leading photo workshops in the new year.

I've done them before in the UK and Germany, where I gave classes to the families of US service personnel. For a while I even did some for Canon when they bought out the the beautiful T90. I would go to hotels etc and teach new owners about the camera and what it could do.

This time however will be a bit different as they will be given in German!

Luckily I was able to prepare myself for this by giving a private portrait photography workshop last weekend. Two ladies who had attended beginners photography courses wanted to expand their knowledge and learn more about portraiture with emphasis on how to create mood, how to work fast and simply and how to make use of depth of field.

The day went amazingly well. I first showed them a Powerpoint about the techniques we would be learning then I took them to the local railway station where we practised fill-in-flash and depth of field.

Then it was back home to try some portraiture using natural light, flash and diffusers.

Six hours later we finished off and I can honestly say that we had a great time. It was wonderful to see their enthusiasm for photography. They had earlier learned the basics of photography but thanks to the extra tuition, had been able to see what they could actually achieve!


Two satisfied pupils! Beatrice and Sonja

To prepare my Powerpoint, I enlisted the aid of my favourite twin models (who just happen to live nearby and love using my camera themselves), Jeniya and Lera whom you may remember from this earlier post. The picture below shows me taking a shot of Lera with my 24mm lens. I did the same portraits at different focal lengths to show how the face can get distorted.


24mm for a portrait is not recommended

Since then, I've had several queries to give other workshops and I'll be starting that in earnest in the new year. First I have to work out dates and subjects to be covered. If you want to expand your photographic knowledge with a like minded group or on a one to one basis, then please contact me.

Of course the girls simply HAD to take photos of each other. They always produce some great work.

 Keeping track of the shoot.


 Jeniya shoots Lera

 Instant proofing!


 My final pictures. Too good an opportunity to miss.

If you are interested in attending a workshop or having a one on one session with me then please drop me an email.

Thanks for reading