Sunday 8 January 2023

Real Estate Photography

The bulk of my work nowadays is real estate photography. As mentioned elsewhere, I enjoy photographing and looking at beautiful examples thereof.

It's almost always a pleasure therefore, to get a commission to photograph interiors for houses or apartments that are going on the market. 

The majority of my commission jobs originate from an international startup company which hires photographers near to where the properties are. Occasionally I also get assignments well outside my area because maybe there are no local photographers available.

My assignments are generally booked for one hour. Sometimes, in the case of a particulary luxurious subject, I'll get two hours.

These are my observations.

The Gear

I carry the bare minimum of gear with me. Important here is a good wide-angle lens. On my Canon full frame body, I'll use the excellent Canon EF 16-35mm f/4.0L IS USM at the widest focal length. On my Fuji body I will use the equally fine Fujinon XF10-24mm F4 R OIS WR, also at the wide end.

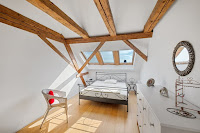
Using the wide end of the lenses creates an illusion of more spaciousness than actually exists. I always set the lens for every image at F11 or F13.


Wideangle lenses create a false sense of roominess

Due to time constraints, I don't take any extra lighting units or stands, so to balance the (sometimes) dark interiors with (often) bright exteriors, I shoot three exposures in quick succession while the camera is mounted on a tripod. These are shot at normal (metered) exposure and then again at minus two stops and again and plus two stops.


 Three exposures


The resulting exposures are then fed into an HDR editing programme which merges all three images. The HDR programme takes the shadow details visible in the overexposed image, the highlight details visible in the underexposed image together with the midtones from the normally exposed imge and blends them together.


The final result is well exposed
 

For my own HDR processing, I use the excellent Photomatix Pro programme which gives a range of finished templates or you have the option to finetune the resuts yourself. The programme currently costs $99 for the watermark free version.

There is however a wonderful and fully featured free alternative called Picturenaut. I wish I'd known about this before I bought my copy several years ago!

What to look out for

Remember. Your job as the photographer is to present the property in an as appealing way as possible. There is a story that the smell of freshly brewing coffee can help swing the sale of a property when prospective clients are onsite. However, well exposed and organised images can help in a virtual sense. 

With that in mind, I make sure that the place looks tidy (if the house is still occupied). Remove any ashtrays and dog/cat baskets visible. Clean windows look a lot better than dusty smeared ones. Normally the house owner or real estate representative will make sure that everything looks good. I don't normally have time to do both cleaning and photography without charging extra.

Some photographers don't like personal items such as family portraits and framed family pictures on display. My reasoning is that they make the house look more like a home and "lived in" instead of a sterile "home and garden" magazine type image. Any personal pictures that appear in any shots are blurred to avoid recognition.


Family pics on this extractor fan give a family "feel".
 

What could possibly go wrong?

Check your gear thoroughly before setting off. If possible take an extra body or extra wide angle lens. Make sure that the front element of your lens is squeaky clean as you will often be shooting into the light which will immediately highlight and greasy fingermarks or blemishes.

Make sure also that your sensor is clean. Any dust spots will show themselves against a blue sky or lightly coloured walls.

Although I don't like the process of "chimping*" (checking each image on the monitor after each shot), it is a must when doing interiors because sometimes the focus is not absolutely spot on. Better to correct it onsite than travel back to base to discover that the image isn't ultra sharp.

Next up are verticals and horizontals. I use the camera's built in electronic level to ensure that the camera is absolutely perpedicular and not tilted etc. This also saves time later in post processing.

Keep the camera vertically and horizontally perfect.

Another thing to consider is that toilet seats should be down. It looks more aesthetically pleasing.


To give a good impression when visiting I also put cloth covers over my shoes to protect the flooring and carpets in the client's home. These are very inexpensive and can be bought online.

Cloth shoe covers

Conclusion

These are the methods that I employ when photographing interiors. They serve me well and I tend not to deviate from them. That's why I can photograph a property in one hour (forty minutes if empty) which is convenient for the home owner and enables me to get to the next one quicker. 

Here are a few of my recent examples.


I hope you enjoyed reading this article and can maybe consider using the info when you next have to shoot interiors. As ever, if you have any queriesplease feel free to contact me.


Tom


*Chimping is a colloquial term used in digital photography to describe the habit of checking every photo on the camera display (LCD) immediately after capture.


Monday 1 February 2021

Camera bags

I love camera bags. 

I am what you may call, a bit of a camera bag junkie!

I have six camera bags and an aluminium wheeled case.

In no particular order of preference, they are  .  .  .


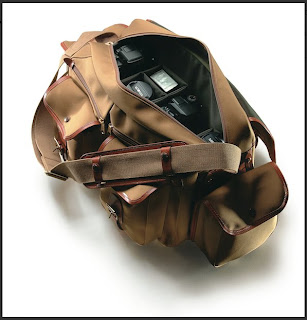
Billingham 550


The oldest. 
I purchased it in 1988. It's a massive Billingham 550 and cost me £108 which, at the time was a LOT of money but I was prepared to pay this because lots of other photographers were using them as they are hard wearing.  The latest price on their website is now £500! You can read about it here. You can also read my review of it on that page.


Billingham 550
The Billingham 550. 
Can accommodate one toddler or lots of camera gear
   

Billingham 550
 

As I mentioned at the beginning, this bag is massive and oozes quality. With hand stitching, brass fittings and waterproof materials used in its construction, it's also quite heavy even when empty! It can comfortably seat an eighteen month old toddler and an SLR! I normally put loads of stuff in it or use it as an airline cabin bag.

Weighing in at 2.6 Kilograms empty, it's the bag that I put in my car and just take stuff out of it as I need it. At the moment it holds an EOS 6d, an EOS 7d plus grip, a 16 - 35 zoom, a 24 - 105 zoom, two Canon Speedlite 420 EX's plus cleaning cloths, batteries, memory cards and miscellaneous other items. The total weight of all these items together with the bag is 11 kilograms. Wash it occasionally with warm soapy water and treat it afterwards with a weatherproofing spray and it'll last for decades.


Billingham System 3

A smaller Billingham bag is also in my collection and I tend to use it for my GoPro Fusion or my Drone stuff. It's also an "oldie" and I paid about £20 for it second hand back in the early nineties (probably around 1994). I searched online for it to find out the model number but eventually resorted to contacting Billingham directly where the helpful Mel told me this: 

 
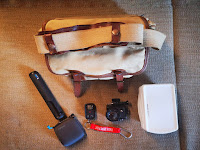
Billingham System 3Billingham System 3Open Billingham System 3

"The model of bag was a System. There were 3 versions of it System 2, System 3 or System 4. It definitely isn't a System 2, speaking to some of the longer working members of staff we think its a System 3 which was a predecessor to the 335".

Billingham System 3 and contentsBillingham System 3 label

I use it now for my GoPro Fusion 360 degree camera and an action camera together with all their accessories.


Hama Katoomba 190 RL

A more recent addition to my collection. The Hama Katoomba190RL. I bought it in 2012 to reduce the stress on my back and shoulders from years of using a normal camera bag. Old habits however die hard and I still find myself picking up and using one of my other "over the shoulder" bags. I wrote about it here and here


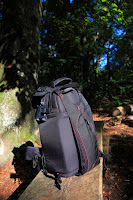
Hama Katoomba 190 RLHama Katoomba 190 RL  in action

Hama Katoomba 190 RL


Hama Katoomba 190 RL on location
On my way to a photoshoot with the 
Katoomba and lighting stands

Hama Katoomba 190 RL  contents
Really well designed and packs a lot in 
It also has a built in rainproof cover.

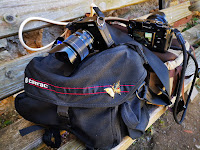
Found in a charity shop. In my youth I always wanted a Tamrac but they were out of my price range. I use mine for my Fujifilm cameras. Mine holds a flash, an X-H1 with grip, an X-E2s, an 18-55 zoom, a 10-18 zoom, a 55 - 200 zoom, a 23mm and a 35mm plus batteries and memorycards This one has storage for rolls of film (which shows its age) and cost me twenty Swiss francs ($20 or £17).
 
Tamrac 5606 System 6

Tamrac 5606 System 6 on location
My Tamrac provides lots of space and is great quality

 
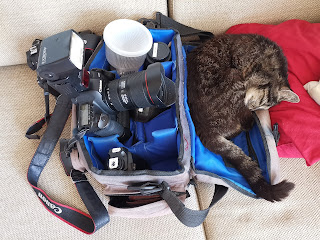
Jessops noname 

Bought in London in the eighties. This bag has been a constant companion and has travelled the World with me. The colour has faded considerably but it is still lightweight and very comfortable to sling over my shoulder.
 
Jessops camera bag
No name Jessop's own brand bag
 
Jessops camera bag and cat
Luckily the cat left before my job.


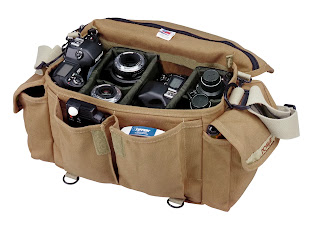
Mekko Report Series Professional Photo Bag

Mekko Report Series Professional Photo Bag

An impulse buy from an auction site. Not yet used and still in the cardboard box in which it arrived. Made in Taiwan from 100% natural cotton canvas with waterproof coating and lots of compartments and stainless steel hardware (zips, buckles etc.). It is a clone/copy of a similar Domke model but a lot less expensive. More details here. There is a great in-depth review of it on this site.


No Name former Makeup case

The last and most recent item in my collection is another charity shop find. 

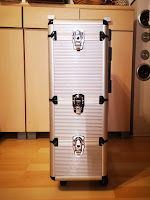
It is a three section aluminium wheeled case. I paid the princely sum of twenty Swiss francs ($20 or £17) for it. There is no  maker's name visible and it has lots of bumps and scratches which bear testament to its ruggedness. A set of keys were included in the price. There is also a collapsible handle which makes it easy to handle and steer when wheeling it around.


According to a sticker which was attached to the case when I bought it, the former owner was a make up artist so I thoroughly cleaned it when I got it back home because I didn't want any left over residue (powders etc) getting inside my gear.


Aluminium 3 tiered camera gear case
The case opened up.


As mentioned, it is in three separate compartments. I use the top compartment to hold lighting gear. There are three Speedlites, a Phottix Odin flash trigger set and various Lambency Universal light diffusors and filters.

The middle part holds two DSLR's and four lenses together with a small Tupperware container with spare batteries and memory cards in it and a bag with cleaning cloths.

The bottom section has all manner of accessories including screwdrivers, hotshoe spirit levels (invaluable), filters and batteries etc

This case is slowly getting more and more use from me especially on a big shoot.

So that's it. I have a collection of bags which have served and continue to serve me well.

Sometimes however, I just can be bothered to schlep a bag around with me and if I know that I won't be needing lots of equipment, I'll but take the bare minimum, like this when I recently did an interior shoot near Zürich!

EOS 6d, tripod and 16-35 zoom lens

Thanks for reading. Do you also have more than one camera bag? Let me know in the comments.

Tom


Friday 8 January 2021

Sometimes the best camera . . .

There's a saying that "the best camera is the one that you have with you". This simply means that to capture an image, you don't necessarily have to use your state of the art DSLR, compact or bridge camera. Whatever you have to hand at that moment will suffice.

This was brought home to me recently when I decided on a whim, to take a few pictures at the nearby Teufelsschlucht (Devil's Gorge).

My aim was to capture a few shots of the waterfall using various shutter speeds to use as source material for some of my photography classes.

I parked nearby and, because of the slippery track down to the gorge, I decided to travel with the bare minimum of gear. Namely my new Fujifilm X-H1, a Fujinon 10-24 wide-angle lens and my trusty Benbo tripod.

Setting off down the track, I was pleased not to be carrying a selection of lenses and bodies with me but when I got to the waterfall I discovered a problem. The waterfall had all but dried up! Hmmm.

I tried a few experimental shots of the trickle of water running down the rock face but it was hardly inspiring. I decided to go back to the car and as I,turned around to make my way out of the gorge, something in my peripheral vision alerted me to the fact that something seemed "out of place". It was a frog. Clinging to the moss which covered the rock face. He (or she?) was poised motionless. Probably waiting for me to leave.

I decided to make the best of an otherwise lost chance. I wanted to take some closeups of the reptile but only had my superwide zoom lens with me: the Fujinon 10-24 f4. This is roughly the equivalent of my Canon 16-35 lens which I use for interiors. I would have preferred to have a macro lens but that was in the car and I really didn't want to trek all the way back to fetch one.

The wonderful Fujinon 10-24 f4 zoom

I re-positioned my Benbo tripod as slowly and as carefully as I could because I didn't want to frighten him off. Using the lens at the 10mm focal length meant that I would have had to get uncomfortably close which I wasn't keen on doing in case it frightened the frog. It would also have made more of the background seem in focus (one of the traits of a wide angle lens) and my aim was to try and isolate the frog and the background as much as I could. 

I chose instead to  shoot at the 24mm end (roughly equivalent to a 38mm lens on full format) and choose a wide aperture to try and render the background as unsharp as possible while still being recognisable as a gorge.


Here is the camera in position. You can see the last remnants of the waterfall in the background.

The Benbo is an extremely versatile tripod and able to get into the most awkward positions.

I am still relatively new to the Fuji system and it took a little bit of messing around to get the exact settings I wanted, but one thing for which I was grateful was the tilting screen. Normally, with the Canon, I'd have to contort myself into being able to see through the viewfinder. With the X-H1 I simply tilted the screen!

Tilting monitor

After a bit of positioning and repositioning, I selected aperture priority mode using f4. With 200 ISO this gave me a shutter speed of 1/4 sec. Such a slow speed wasn't a problem because the frog was obligingly still!

Several pics in both vertical and horizontal mode and this pic (above) was my favourite.

So. As I wrote at the beginning, the best camera for capturing something is the one that you have with you at the time. If I had only had my mobile phone with me, I would have used that. A super wide zoom is not the ideal lens for close-up nature photographs but it was all that I had with me.

Thanks for reading. Have you taken pics with gear that isn't normally used or recommended for a particular subject? Leave a comment and tell me about it. 

Tom

Sunday 29 November 2020

The Four Seasons

This is not a blog post about Vivaldi's seminal work

Some years ago when living in my previous apartment, I photographed the same view from my kitchen window during the four seasons, Spring, Summer, Autumn and winter.

At the end of the year, I combined them into one image using my image editing programme. It was purely a personal project and the people I showed seemed to like it.

My 1st attempt. View from the kitchen window

After a two year break from thinking about it, I decided to do another. This time with an historical angle.

I am lucky to be living in a beautiful area that has several castles, forests and ruins all within a short distance from my apartment. This was important because I couldn't guarantee that the weather would be the same as I wanted when arriving there. 

My partner and I visited several places over a period of weeks before deciding on a view halfway between my place and the town of Balsthal. There is a parking spot which affords a spectacular view of the ruins of Castle Neu Falkenstein.

My rules for the four seasons project are pretty much the same as for when I am documenting progress on building sites. I wrote about it here.

We picked a good vantage point and my partner , Sue, took pictures of where I was standing and which fence post I would be standing beside as an "aide de memoire" for later.


My location. Google Streetview image


 My viewpoint. Picture by Sue.


The exact fence post!😀

I took the first picture this year (2020) in February. We had a light sprinking of snow and I didn't know if there would be another* 


February 2020

After choosing a viewpoint, it is also of course important to use the same camera and lens setup for every picture. I settled on my Fujifilm XE-2s coupled with the 18-55 zoom, always set at 55mm. The focus point chosen was always the middle one and I had the "level indicator" always visible in the viewfinder in order to keep the camera level. Doing all this helps the final editing to go a lot smoother.

Guidelines showing the center of the image

The following images were taken using the methods and equipment desribed above in April, July and October.

April. Spring

 July. Summer


October. Autumn

After the final picture was taken, it was a simple job to create a new document in Affinity Photo with a layer for each season. I then divided the image into four and erased any bits that didn't belong. This is the final result.


I am rather pleased with the end result and am currnetly looking for my next location(s).

This is a simple and very pleasurable photo project that gets you out of the house and exploring new (or familiar) places. It is interesting to view the changes over the course of a year. Of course, your final image doesn't have to be in the style that I did. You could display them separately or have all four in a frame.

Whatever you do, have fun and be safe.

Tom


 *There hasn't been yet.(November 2020)