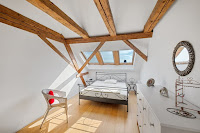
The bulk of my work nowadays is real estate photography. As mentioned elsewhere, I enjoy photographing and looking at beautiful examples thereof.
It's almost always a pleasure therefore, to get a commission to photograph interiors for houses or apartments that are going on the market.
The majority of my commission jobs originate from an international startup company which hires photographers near to where the properties are. Occasionally I also get assignments well outside my area because maybe there are no local photographers available.
My assignments are generally booked for one hour. Sometimes, in the case of a particulary luxurious subject, I'll get two hours.
These are my observations.
The Gear
I carry the bare minimum of gear with me. Important here is a good wide-angle lens. On my Canon full frame body, I'll use the excellent Canon EF 16-35mm f/4.0L IS USM at the widest focal length. On my Fuji body I will use the equally fine Fujinon XF10-24mm F4 R OIS WR, also at the wide end.
Using the wide end of the lenses creates an illusion of more spaciousness than actually exists. I always set the lens for every image at F11 or F13.
Wideangle lenses create a false sense of roominess
Due to time constraints, I don't take any extra lighting units or stands, so to balance the (sometimes) dark interiors with (often) bright exteriors, I shoot three exposures in quick succession while the camera is mounted on a tripod. These are shot at normal (metered) exposure and then again at minus two stops and again and plus two stops.
Three exposures
The resulting exposures are then fed into an HDR editing programme which merges all three images. The HDR programme takes the shadow details visible in the overexposed image, the highlight details visible in the underexposed image together with the midtones from the normally exposed imge and blends them together.
For my own HDR processing, I use the excellent Photomatix Pro programme which gives a range of finished templates or you have the option to finetune the resuts yourself. The programme currently costs $99 for the watermark free version.
There is however a wonderful and fully featured free alternative called Picturenaut. I wish I'd known about this before I bought my copy several years ago!
What to look out for
Remember. Your job as the photographer is to present the property in an as appealing way as possible. There is a story that the smell of freshly brewing coffee can help swing the sale of a property when prospective clients are onsite. However, well exposed and organised images can help in a virtual sense.
With that in mind, I make sure that the place looks tidy (if the house is still occupied). Remove any ashtrays and dog/cat baskets visible. Clean windows look a lot better than dusty smeared ones. Normally the house owner or real estate representative will make sure that everything looks good. I don't normally have time to do both cleaning and photography without charging extra.
Some photographers don't like personal items such as family portraits and framed family pictures on display. My reasoning is that they make the house look more like a home and "lived in" instead of a sterile "home and garden" magazine type image. Any personal pictures that appear in any shots are blurred to avoid recognition.
What could possibly go wrong?
Check your gear thoroughly before setting off. If possible take an extra body or extra wide angle lens. Make sure that the front element of your lens is squeaky clean as you will often be shooting into the light which will immediately highlight and greasy fingermarks or blemishes.
Make sure also that your sensor is clean. Any dust spots will show themselves against a blue sky or lightly coloured walls.
Although I don't like the process of "chimping*" (checking each image on the monitor after each shot), it is a must when doing interiors because sometimes the focus is not absolutely spot on. Better to correct it onsite than travel back to base to discover that the image isn't ultra sharp.
Next up are verticals and horizontals. I use the camera's built in electronic level to ensure that the camera is absolutely perpedicular and not tilted etc. This also saves time later in post processing.
Keep the camera vertically and horizontally perfect.
Another thing to consider is that toilet seats should be down. It looks more aesthetically pleasing.
Cloth shoe covers
Conclusion
These are the methods that I employ when photographing interiors. They serve me well and I tend not to deviate from them. That's why I can photograph a property in one hour (forty minutes if empty) which is convenient for the home owner and enables me to get to the next one quicker.
Here are a few of my recent examples.
I hope you enjoyed reading this article and can maybe consider using the info when you next have to shoot interiors. As ever, if you have any queriesplease feel free to contact me.
Tom
*Chimping is a colloquial term used in digital photography to describe the habit of checking every photo on the camera display (LCD) immediately after capture.
.jpg)


.jpg)
.jpg)
.jpg)


.jpg)
.jpg)
.jpg)