Thursday 19 December 2013

Passes


Passes. they get you into exclusive places and help you get unique images right? Maybe.


I was recently going through some of my old notes and photos from early on in my career and I came across notes that I had made regarding my day to day activities.

Working for one local county paper at the time it is now amazing to me to see how many jobs I would have to cover in a day.


 Two pages from 1991

Obviously for these jobs it was just a case of locating the place on an A -Z map, driving there, finding parking, locating the subject and photographing them then going on to the next job. As you can see from the entries there was sometimes very little time between each job. It meant I had to have a preconceived idea of the picture I wanted and not repeating it for every job of that day / week.

 Most of these jobs were standard local newspaper fare. Charity stuff, wedding anniversaries, "local boy does good" and cheque presentations (a.k.a.grip 'n grin), normally with a ridiculously oversized cheque.


The other jobs however, the "important" jobs where there would be national interest meant that a Pass was needed.

My first experience with press passes came in 1985 when the first Live Aid concert was staged in Hyde Park. A friend of mine had a photography pass and he let me see it. It was roughly the same dimensions as a standard 6" x 4" (10 x 15 cm) paper print which gave me an idea . . .
I photographed the pass with my T90 which was holding my 50mm lens to which I attached a couple of canon close up filters. I made sure that the pass completely filled my field of view and took a shot. This I processed in a one hour mini-lab, laminated it and hey presto, I had a counterfeit press pass for live Aid!

Other occasions however, required a bit more legitimacy. It used to be (back when I was an active press photographer in London) that if you were photographing government or royalty you would need a rota pass. This was issued by the C.O.I ( Chamber of Information ) and normally on a first come, first served basis.

One pass was given each to a monochrome and colour photographer with others going to TV and foreign press members. There would be separate passes for the entrance, the interior and the exit.. All these passes were issued with the proviso that all images were made available to any media organisation that required them for a period of up to two years.

The passes varied from the elaborately printed to the craftshop specials and there never seemd to be any logic behind it. For instance, when I photographed ex Russian president Gorbachev's visit to the UK back in 1989, I had to be vetted by Scotland Yard, have a specially printed press card and three other passes. The closest I got to him was 50 yards (45 meters) away.


Passes for the Gorbachev visit.
Whereas a couple of months later I took this picture of the Queen with a pass that looked like it had been made by a six year old!
 HM The Queen and the pass I needed to get close.

With the right organisation behind you and a proven track record as a photographer, you will be able to get a pass and get (sometimes) access to the famous people. Although having said that, my best picture of Gorbachev came when I was out with my camera and saw him doing an impromptu walkabout.


Some passes were actually quite ridiculous. I was covering the Tall Ships race back in 1993 in Newcastle and was duly given an all "areas pass" which  was required to have visible at all times. This pass was HUGE! This is a picture of it lying next to my mobile phone. 

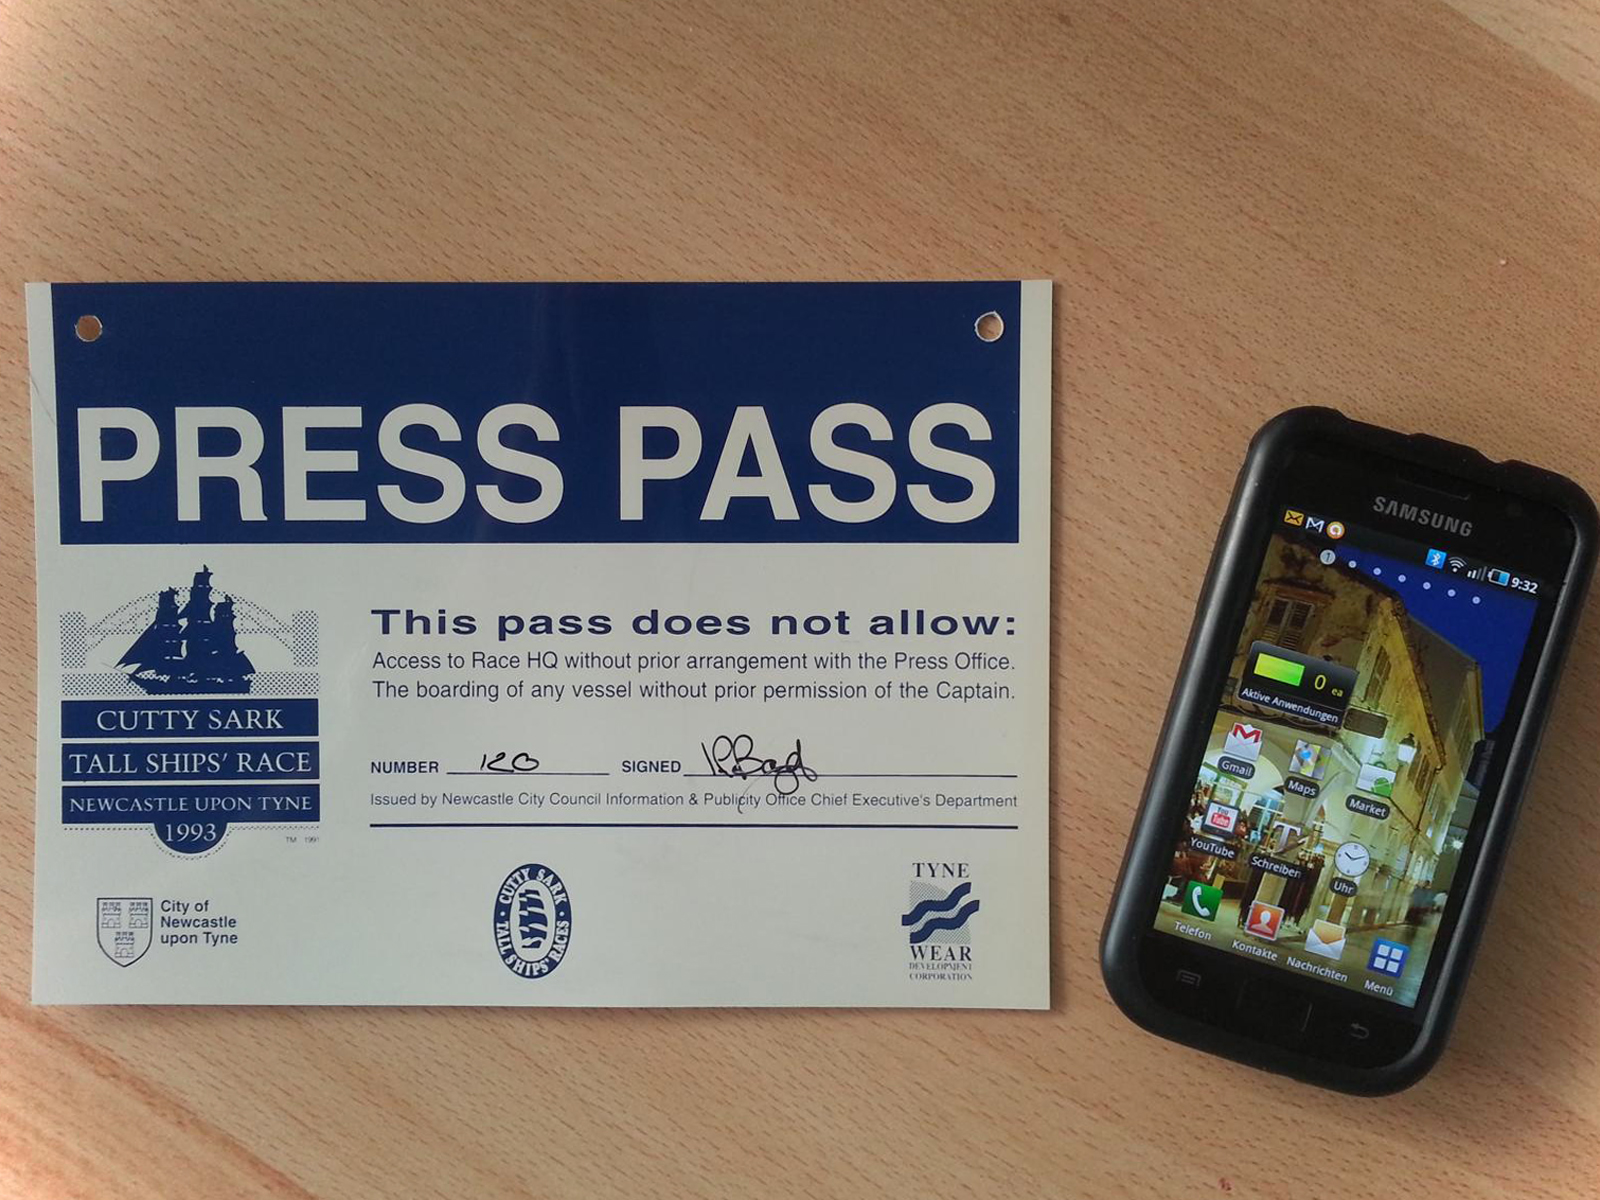
Like wearing a sandwich board!

Here are some of the other passes from my collection.

 Various royal passes


 Various installation passes.


I was prompted to write this article after going to photograph a bank in Basel which was still under construction. I arrived at the reception, explained myself to the two security guards, filled out some forms and was solemnly handed this pass!


Thanks for reading.


Thursday 14 November 2013

Photo workshops

As alluded to in my last post, I will be leading photo workshops in the new year.

I've done them before in the UK and Germany, where I gave classes to the families of US service personnel. For a while I even did some for Canon when they bought out the the beautiful T90. I would go to hotels etc and teach new owners about the camera and what it could do.

This time however will be a bit different as they will be given in German!

Luckily I was able to prepare myself for this by giving a private portrait photography workshop last weekend. Two ladies who had attended beginners photography courses wanted to expand their knowledge and learn more about portraiture with emphasis on how to create mood, how to work fast and simply and how to make use of depth of field.

The day went amazingly well. I first showed them a Powerpoint about the techniques we would be learning then I took them to the local railway station where we practised fill-in-flash and depth of field.

Then it was back home to try some portraiture using natural light, flash and diffusers.

Six hours later we finished off and I can honestly say that we had a great time. It was wonderful to see their enthusiasm for photography. They had earlier learned the basics of photography but thanks to the extra tuition, had been able to see what they could actually achieve!


Two satisfied pupils! Beatrice and Sonja

To prepare my Powerpoint, I enlisted the aid of my favourite twin models (who just happen to live nearby and love using my camera themselves), Jeniya and Lera whom you may remember from this earlier post. The picture below shows me taking a shot of Lera with my 24mm lens. I did the same portraits at different focal lengths to show how the face can get distorted.


24mm for a portrait is not recommended

Since then, I've had several queries to give other workshops and I'll be starting that in earnest in the new year. First I have to work out dates and subjects to be covered. If you want to expand your photographic knowledge with a like minded group or on a one to one basis, then please contact me.

Of course the girls simply HAD to take photos of each other. They always produce some great work.

 Keeping track of the shoot.


 Jeniya shoots Lera

 Instant proofing!


 My final pictures. Too good an opportunity to miss.

If you are interested in attending a workshop or having a one on one session with me then please drop me an email.

Thanks for reading


Monday 11 November 2013

Diversification

Technology is moving at breakneck speed. Print media is no longer king. If you don't get on-board social media you are doomed to be left behind. That is not an understatement. 

I was somewhat saddened and amused at the ignorance of a man I spoke to at a large Swiss company a year or so back. I asked him ( in his new role as head of the advertising department ), what plans he had to implement social media.

His reply? "I have no plans whatsoever to use socia media channels. They don't bring anything to the table".

Out of curiosity I Googled this gentleman (don't we all?) and found that he actually has a Twitter account, into which he has posted precisely (at the time of this post) FOUR tweets since joining in 2009. One of the Tweets concerned one of the firm's new products.

It's quite inconceivable to me to see how he is going spread the word for his company if he refuses to join the revolution. I see that none of his sixteen followers re-tweeted the product launch news from him. He seems to think that the company's website and paper based print media is the way forward.

At a recent trade fair where he was hosting a stand, I noticed that nearly every other company had a dedicated Facebook page and Twitter account. I was able to follow their activities and get details on the newest product releases etc but from his company there was nothing.

I do notice to his credit however, that he had had videos commissioned to show off the company's products but without the social media aspect to spark interest, there have been very few views.

In October 2011, I began to get interested in social media and online marketing. Statistics fascinate me and with these facts in mind, I started an anonymous blog to test out my theories. I decided from the start to make it anonymous so that the visitor count wouldn't be influenced by any of my acquaintances visiting it. I launched it without any fanfare whatsoever and studied the statistics. Using only keywords, hashtags and a few other search engine optimisation techniques I see that it has now had 61,000 hits!

 Statistics as of November 2013


So what exactly does this have to do with photography I hear you ask?
 
On my own personal website, I again played with the S.E.O. management and elevated it to number two on the Google Switzerland search results when people type in "fotografie aller art" (all types of photography) into the search field. All this without paying for Adwords or anything.

Well as the title of this post suggests, diversification is the key to surviving nowadays. Apart from photography, I am now offering website optimisation and building to several clients. I'll be helping them get a foothold in the world of social media. Also in the pipeline will be photography workshops in the new year. I'll be writing more about that in my next post.

So to reiterate. Content is king and the best way to get that content out there is to jump onboard the social media bandwagon. You'd better hurry though because it isn't slowing down!

Thanks for reading.


Thursday 24 October 2013

Shooting a wedding

Many years ago when I lived in the UK, I did freelance wedding photography every weekend for a national company. I shot everything on medium format film (which was supplied in almost unlimited quantities) and simply covered the proceedings. At the end of the shoot, I'd mail all the film back to the company in a pre-paid envelope and receive a cheque a few weeks later.

This type of photography was a great tool in building up my confidence in dealing with people. Simply turn up at the bride's house on the morning of the wedding, introduce yourself and start shooting!

If there were any faulty images, the company would send me a contact sheet and provide suggestions such as "flash too weak here" or maybe "don't pose anyone in front of the ride in a group shot". 

I was supplied initially with a "shot list" from the company in the form of a contact sheet and carried this with me to all my early weddings, referring to it surreptitiously when no-one was watching.

After a while I discarded the list and made my own. This is a list that I try and get at every wedding that I shoot. It's by no means exhaustive and these not the only images that you should capture.

The best piece of advice I can give is to make contact with the best man and use him to gather the people necessary for your pictures. Tell him to stick with you. 

Naturally these aren't the only pictures you should take. You should always be on the lookout for candid pictures which help to tell the story of the big day.

I try and make the process of getting the group shots as fluid as possible so that people are simply added or removed from subsequent groups.

 Shot number 22 from my list.
EOS 5d MKII, 17mm lens, 200 ISO, flash 1/200 @6.3


Here are my "must have" pics.


Before the ceremony:

  1. Bride at home getting ready, last pics with mum and dad.
  2. Pic of bride and dad at the doorway. Possible taken from inside the house with them looking over their shoulder at you and one from outside.
  3. Guests mingling and waiting outside the church.
  4. Groom with best man waiting. (Maybe looking at his watch impatiently  :o))
  5. Bride getting out of car. Dad helping her.

During the ceremony: This is dependent upon the location and the permission but normally includes:

  1. The bride walking up the aisle from behind with the groom in the background.
  2. Each person placing a ring on their partner’s finger.
  3. The priest blessing the couple.
  4. Signing the register.
  5. Maybe a pic with the couple and the priest in the church.
  6. A pic of the couple inside the car. Sit on the front seat and ask them to squash together.

After the ceremony:
  1. Confetti as they come out of the church (let them get congratulated by guests etc., then proceed with these shots).
  2. Bride and Groom together (bride on your right).
  3. Bride and Groom together with her parents (boy, girl, boy girl).
  4. Bride and Groom together with his parents (boy, girl, boy girl).
  5. Bride and Groom together with both parents (his on his side and hers on her side).
  6. Bride and Groom together with her parents plus brothers and sisters and spouses / partners.
  7. Bride and Groom together with his parents plus brothers and sisters and spouses / partners.
  8. Bride and Groom together with best man and maid of honour.
  9. Bride and Groom together with his grandparents.
  10. Bride and Groom together with her grandparents.
  11. Bride and Groom together with both sets of grandparents.
  12. Bride and Groom together with any special guest(s) (maybe someone from overseas).
  13. Groom with best man.
  14. Bride with maid of honour.
  15. Bride and Groom together with bridesmaids.
  16. Best man alone (full length plus three quarter).
  17. Maid of honour alone (full length plus three quarter).
  18. Best man and maid of honour together.
  19. Separate pics of the bridesmaids.
  20. Group photo of all bridesmaids together.
  21. Group photo of all bridesmaids together plus best man.
  22. Maybe one last photo of all guests together with the couple standing about six feet in front of them. (You have to get elevated for this one. I use a small stepladder).


You can also download this list in PDF form on my website here.

Thanks for reading.


Wednesday 9 October 2013

Cover up. Or not

I was recently up in my attic looking for slides worth scanning.

As in usually the the case I got distracted and began looking in other containers as well. I came across my old lens caps. 

I learnt early on in my career that situations can change fluidly when you are on a job. For this reason, I have never bought an ever ready case, ( also known as a never ready case ) to put my camera in. There's nothing more frustrating than trying hurriedly to get a picture but first having to snap open two studs on the case, manoeuvre  it over the camera and lens, switch on the camera then bring it up to eye level ready to shoot.

 My old lens caps. Some dating back to 1982.

My solution is to get rid of the caps and to protect the front element of the lens with a good quality UV or skylight filter and a deep lens hood. In the early days I used the collapsible rubber lens hoods which also acted as shock absorbers.

 Body caps. L-R  EF, FD and FL (I think)

If I later sell a lens, I will of course include the lens cap but I do tend to keep my equipment for a long time.

It's embarrassing to bring the camera up to eye level then realise that everything in the viewfinder is dark. Also if you are using a range finder camera (without live view obviously), you probably wouldn't notice that the lens cap was on like this unfortunate gentleman. . . .


Thanks for reading.

Monday 30 September 2013

Film to burn?

Most of us photographers have heard the expression "film to burn". I thought about it recently when I saw this.

There was a piece on the news earlier this week about the lighting of the Olympic flame before it begins its journey to Sochi for 2014.

I saw the wide shot of the flame being lit but then, as the camera zoomed in, I saw what looked like a piece of 35mm film being used as the accelerant.


Wide shot

 
 Close up

What do you think?

Here's a video of what I saw.


Update: 

This small humorous piece was picked up and reproduced by two of my favourite sites. This resulted in a 50% surge of visitors. The two sites were Petapixel and Gizmodo. Ken Lacouture has also mentioned it on his blog.

Thursday 29 August 2013

Batteries and boxes

We photographers do tend to carry a lot of batteries around with us don't we?

For my flashes, which can't use an external pack, I normally have twelve AA size ones in my bag. Four will be in the flash itself and the other eight act as spares.

Sometimes, when things are moving fast and you need to grab another four penlights, what do you do? In the old days, I used to wrap an elastic band around them to keep them together . This wasn't the ideal solution because after a few months, the rubber would perish and the batteries would spill all over the floor.

Then I had the idea of keeping them in a slide box that originally held 36 mounted transparencies.


This method lasted me until I started using digital cameras and I also had to find space for the memory cards as well. I wanted to have something to store the penlights and the memory cards together.

I have now found the ideal solution. The German company Ansmann make a fantastic battery box that is light weight, slim and holds either AA, AAA's or memory cards or any combination thereof.

I bought three from my local branch of Pearl for Fr 4.95 each. 


Three boxes slotted together


Once the labels are peeled (very easily) away, you will see marking to indicate if the batteries are full.


All in all, a wonderful little accessory that doesn't cost much and will last a very long time. It's one of those things that will stay in your camera bag for years to come. Thoroughly recommended.

Thanks for reading.

Wednesday 14 August 2013

Three different ways of using an image.

I was at Zürich airport last weekend to say goodbye to a family member.

I neglected to take a camera with me as I thought it would be a quick goodbye at the airport and then back home. 

I was mistaken.

There is an observation deck open to the public which costs only Fr 5 and affords the visitor some splendid photo opportunities so we decided to take a look.

After seeing all the aircraft taking off from such a great vantage point, I decided to take a few snaps. 

First off I used the panorama function on my Samsung Galaxy S3 to take in a wide area of the apron.

This is the view I got with five images.


Press the play button and you can use your mouse to "move around" in the image.

I then went to the other end of the observation deck and watched the larger aircraft taking off.

It was a very sunny day and I could hardly see the screen on my phone even when it was shielded by my hand. I found myself having to use reference points to guess when the aeroplane would be visible. With that in mind, I decided to use the "burstmode" on the Galaxy to make sure that I would get the 'plane in view ( the so called spray and pray method so beloved of many sports photographers ). On the Samsung Galaxy this is activated simply by holding your finger on the release button. I was making around twenty images in a few seconds.

Burst sequence on the Galaxy S3

When I got home, I had the idea of making an animated Gif of this sequence.

A quick search online led me to this website which makes free gifs using images that you upload. I simply resized all the images I needed then uploaded them. In seconds I was presented with an animated gif of the Swiss aeroplane taking off.

Animated gif, courtesy of Gifmaker.me

One of the images I decided, would make a great desktop background, so I loaded it into Snapseed. After lightening the shadows a bit and increasing the saturation a touch, I was ready to use this image on my PC.

 My new PC background

I did take several other images that day but they will have to wait for another post.

I hope you enjoyed reading this.


Tuesday 6 August 2013

There probably isn't an App for this. Yet!


If I'm feeling lazy and want to reproduce a tilt shift effect on an image with my mobile phone, I can use the Snapseed App. If I want a faux HDR effect, there's an App for that as well.

However, there's one effect that I haven't yet found an App for. Can you guess what it is? The answer is . . wait for it . . polarisation.

That's right. the humble (if somewhat expensive) polariser filter. 

I've always had polarisers in my equipment collection. They are a great accessory and if looked after correctly, will last as long as, if not longer than, your camera gear.

So, what does this marvellous piece of glass do?

To put it briefly, it removes reflections from non metallic surfaces and intensifies colours. But, there is a caveat. The effect will be most effective when used at right angles to the sun. This means that if you are using it to remove glare from a shop window, then don't stand full on to the window. 

The polariser has two rings. One has the filter thread and remains fixed on the lens while the other rotates. The effect of this rotation is visible when looking at a live image through the viewfinder. You notice the effect, whether it's reflections disappearing, blue skies getting more intense or colours intensifying as you turn the ring.

Here are a few examples that I took a couple of weeks back. This was a spur of the moment thing so I didn't have a tripod with me to produce exactly the same field of view in each image. I had to first take the picture, then screw the filter on and rotate it for the best effect and then take the next picture.

I saw this interesting shop window in the town of Wangen an der Aare. It was a very sunny day (ideal for polarisers) but there were lots of reflections. Standing at a right angle to the window I rotated the front filter ring whilst observing it through the viewfinder. When I saw that it had removed most of the glare, I took a picture.


 Before and after

One thing to note, when using the polariser is that it cuts down on the light reaching the film / sensor. to counter this, you can either increase the ISO or use a tripod if you think that the exposure will be too slow.

Then it was down to the river where I wanted to demonstrate the water reflection killing capabilities of the polariser.


Again, a before and after shot showing how the slightly washed out sky plus the grass colours in the first shot have been strengthened in the second one along with lots of the water reflections being eliminated.


 As if more proof were needed. Here is my favourite example shot from that day. Just look at how much more intense and clear the water is in the second photo when compared with the un-polarised first picture

Another word of warning. As I mentioned earlier, the filter consists of two rings. If you are using one on a very wide lens, you may experience vignetting where the filter is visible in the corners of the image (i.e.dark corners). To combat this, take off any other filters already on the lens or buy one of the newer generation of slim filters.

Thanks for reading. Please feel free to leave any comments or even ask a question or two!

Wednesday 3 July 2013

Backing up

On location backups

A colleague of mine recently requested my advice about buying a camera. As he became more and more engrossed in this wonderful hobby he enquired about how to best back up his images. I explained my method and told him to copy or adapt it to his way of working.

Here's what I do:
  1. Shoot pictures
  2. Copy the images to my laptop (leave the images on the card for now)
  3. Copy* these images from the laptop to external hard drive number 1.
  4. Copy* these onto External hard drive number 2.
  5. Work on the laptop on any images that need a touch of Photoshop
  6. Repeat steps 3 & 4
  7. Once I am sure that hard drives 1 & 2 match, I format the cards in the cameras they are to be used in. Depending on the content, I sometimes completely wipe the cards*, leaving no trace of what was on there before. I then remove them from my laptop.
  8. I give hard drive number 2 to a colleague who stores it for me. I do this because in the event of fire or whatever, I will have one copy at least of my images. (Needless to say, my hard drive is password protected.

 Nine terrabytes of space
 

To completely wipe my cards or hard drive clean, I use the excellent "Shredder" freeware programme by B. Nikhil Baliga. It's available from this website.

* For the copying, I use the free SyncToy from Microsoft. It has the option to copy only the files that have changed since your last backup. You can download it for free here.

Any backup system is better than no back up system .

What method do you use?

Thanks for reading.

Tuesday 2 July 2013

On location photoshoot result

You may remember that I published a piece here detailing how I carried out a quick photo shoot for Nobel Biocare magazine at the dental practice of Dr R. Sleiter?

At the end of that article Iwrote "It will be interesting to see which image they use in the magazine."

Well this morning I received a few complementary copies of the magazine and I've reproduced the page layout where they used my image below.


I've said it before and I'll say it again. We may live in the digital age, but nothing beats seeing your work in print.

Thanks for reading.

Friday 31 May 2013

Amazing sunset.

Saw the most amazing sunset last night. At first I thought it was a fire in the distance but the colours started to spread across the sky and gradually grew more and more intense.
The first four images were taken with the 5D MKII and a 24 - 105mm zoom


 I then attached my 300mm f4 for this one.

300mm lens 1/128@f4
  
These two were taken using the Samsung Galaxy 3.

The really unusual thing about it was that my camera was pointing south!
Thanks for reading