Thursday, 29 August 2013

Batteries and boxes

We photographers do tend to carry a lot of batteries around with us don't we?

For my flashes, which can't use an external pack, I normally have twelve AA size ones in my bag. Four will be in the flash itself and the other eight act as spares.

Sometimes, when things are moving fast and you need to grab another four penlights, what do you do? In the old days, I used to wrap an elastic band around them to keep them together . This wasn't the ideal solution because after a few months, the rubber would perish and the batteries would spill all over the floor.

Then I had the idea of keeping them in a slide box that originally held 36 mounted transparencies.


This method lasted me until I started using digital cameras and I also had to find space for the memory cards as well. I wanted to have something to store the penlights and the memory cards together.

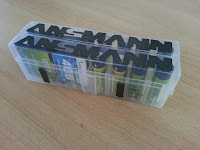
I have now found the ideal solution. The German company Ansmann make a fantastic battery box that is light weight, slim and holds either AA, AAA's or memory cards or any combination thereof.

I bought three from my local branch of Pearl for Fr 4.95 each. 


Three boxes slotted together


Once the labels are peeled (very easily) away, you will see marking to indicate if the batteries are full.


All in all, a wonderful little accessory that doesn't cost much and will last a very long time. It's one of those things that will stay in your camera bag for years to come. Thoroughly recommended.

Thanks for reading.

Wednesday, 14 August 2013

Three different ways of using an image.

I was at Zürich airport last weekend to say goodbye to a family member.

I neglected to take a camera with me as I thought it would be a quick goodbye at the airport and then back home. 

I was mistaken.

There is an observation deck open to the public which costs only Fr 5 and affords the visitor some splendid photo opportunities so we decided to take a look.

After seeing all the aircraft taking off from such a great vantage point, I decided to take a few snaps. 

First off I used the panorama function on my Samsung Galaxy S3 to take in a wide area of the apron.

This is the view I got with five images.


Press the play button and you can use your mouse to "move around" in the image.

I then went to the other end of the observation deck and watched the larger aircraft taking off.

It was a very sunny day and I could hardly see the screen on my phone even when it was shielded by my hand. I found myself having to use reference points to guess when the aeroplane would be visible. With that in mind, I decided to use the "burstmode" on the Galaxy to make sure that I would get the 'plane in view ( the so called spray and pray method so beloved of many sports photographers ). On the Samsung Galaxy this is activated simply by holding your finger on the release button. I was making around twenty images in a few seconds.

Burst sequence on the Galaxy S3

When I got home, I had the idea of making an animated Gif of this sequence.

A quick search online led me to this website which makes free gifs using images that you upload. I simply resized all the images I needed then uploaded them. In seconds I was presented with an animated gif of the Swiss aeroplane taking off.

Animated gif, courtesy of Gifmaker.me

One of the images I decided, would make a great desktop background, so I loaded it into Snapseed. After lightening the shadows a bit and increasing the saturation a touch, I was ready to use this image on my PC.

 My new PC background

I did take several other images that day but they will have to wait for another post.

I hope you enjoyed reading this.


Tuesday, 6 August 2013

There probably isn't an App for this. Yet!


If I'm feeling lazy and want to reproduce a tilt shift effect on an image with my mobile phone, I can use the Snapseed App. If I want a faux HDR effect, there's an App for that as well.

However, there's one effect that I haven't yet found an App for. Can you guess what it is? The answer is . . wait for it . . polarisation.

That's right. the humble (if somewhat expensive) polariser filter. 

I've always had polarisers in my equipment collection. They are a great accessory and if looked after correctly, will last as long as, if not longer than, your camera gear.

So, what does this marvellous piece of glass do?

To put it briefly, it removes reflections from non metallic surfaces and intensifies colours. But, there is a caveat. The effect will be most effective when used at right angles to the sun. This means that if you are using it to remove glare from a shop window, then don't stand full on to the window. 

The polariser has two rings. One has the filter thread and remains fixed on the lens while the other rotates. The effect of this rotation is visible when looking at a live image through the viewfinder. You notice the effect, whether it's reflections disappearing, blue skies getting more intense or colours intensifying as you turn the ring.

Here are a few examples that I took a couple of weeks back. This was a spur of the moment thing so I didn't have a tripod with me to produce exactly the same field of view in each image. I had to first take the picture, then screw the filter on and rotate it for the best effect and then take the next picture.

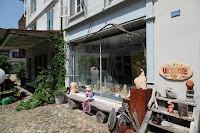
I saw this interesting shop window in the town of Wangen an der Aare. It was a very sunny day (ideal for polarisers) but there were lots of reflections. Standing at a right angle to the window I rotated the front filter ring whilst observing it through the viewfinder. When I saw that it had removed most of the glare, I took a picture.


 Before and after

One thing to note, when using the polariser is that it cuts down on the light reaching the film / sensor. to counter this, you can either increase the ISO or use a tripod if you think that the exposure will be too slow.

Then it was down to the river where I wanted to demonstrate the water reflection killing capabilities of the polariser.


Again, a before and after shot showing how the slightly washed out sky plus the grass colours in the first shot have been strengthened in the second one along with lots of the water reflections being eliminated.


 As if more proof were needed. Here is my favourite example shot from that day. Just look at how much more intense and clear the water is in the second photo when compared with the un-polarised first picture

Another word of warning. As I mentioned earlier, the filter consists of two rings. If you are using one on a very wide lens, you may experience vignetting where the filter is visible in the corners of the image (i.e.dark corners). To combat this, take off any other filters already on the lens or buy one of the newer generation of slim filters.

Thanks for reading. Please feel free to leave any comments or even ask a question or two!